First what is XHProf?
From: https://github.com/facebook/xhprof
XHProf is a function-level hierarchical profiler for PHP and has a simple HTML based user interface. The raw data collection component is implemented in C (as a PHP extension). The reporting/UI layer is all in PHP. It is capable of reporting function-level call counts and inclusive and exclusive wall time, CPU time and memory usage.
From: http://pecl.php.net/package/xhprof
XHProf: A Hierarchical Profiler for PHP
XHProf is a function-level hierarchical profiler for PHP and has a simple HTML based navigational interface. The raw data collection component is implemented in C (as a PHP extension). The reporting/UI layer is all in PHP. It is capable of reporting function-level inclusive and exclusive wall times, memory usage, CPU times and number of calls for each function. Additionally, it supports ability to compare two runs (hierarchical DIFF reports), or aggregate results from multiple runs.
There are a number of ways to profile and monitor the performance of PHP code in a development environment, but once it’s been let loose on a production server its extremely difficult to know what’s going on when your app is getting accessed by your users.
In March 2009, Facebook released XHProf, a function level profiler that allows you to identify bottlenecks in your application. And it runs on a production server with little overhead.
XHProf will provide you with a hierarchical profile of the functions your application calls, allowing you to follow the chain of events that lead up to resource intensive code running. You’ll be able to see exactly how much wall time (the actual time elapsed), CPU time and memory your application uses.
This tutorial will help you get XHProf installed on your server, and integrated with your CodeIgniter application via hooks so that you can start profiling your application, in a production environment, straight away. Everything you see here was written for Ubuntu 12.04:
Installation of XHProf can be done via PECL – as per php manual, it’s very hectic get the PECL version installed on Ubuntu. For me it’s easier to install from source.
So here I will explain how to install from source. To install from source we will require “phpize” pecl extension. So first we will install phpize.
In this topic I am assuming a PHP web server running with (Apacpe and PHP).
Step 1.) How to install phpize on ubuntu?
On Debian/Ubuntu, it’s in the php5-dev package, so we will install php dev package.
$ sudo apt-get install php5-dev
It will be available here: /usr/bin/phpize instead of only phpize.
The php5-dev package contains various files absolutely essential to compiling PHP. Since it’s a shell script, you can just copy it from the package, but it won’t work without the dependencies for building a PHP extensions (like header files).
Explanation
In the C world, compiling dynamically linked libraries (DLL/SO) is done by using header files that contain the description on how the libraries are to be interacted with (function calls, structures, etc). These are used to compile an extension without the need for the PHP source code itself. In other words, you don’t need the PHP source but you actually need the header files which are contained in php5-dev.
You can check with phpize cmd
Step 2.) How to install XHProf on ubuntu
To install from source first download source from github (https://github.com/facebook/xhprof/tarball/master)
$ wget https://github.com/facebook/xhprof/tarball/master -O xhprof.tar.gz
if you get error :
–2013-10-28 18:30:29– https://github.com/facebook/xhprof/tarball/master
Resolving github.com (github.com)… 192.30.252.130
Connecting to github.com (github.com)|192.30.252.130|:443… connected.
ERROR: cannot verify github.com’s certificate, issued by `/C=91/ST=UP/L=Noida/O=SRI/OU=SRI/CN=SRI/emailAddress=rakesh.snr@samsung.com’:
Unable to locally verify the issuer’s authority.
To connect to github.com insecurely, use `–no-check-certificate’.
then use this
$ wget --no-check-certificate https://github.com/facebook/xhprof/tarball/master -O xhprof.tar.gz
Extract the tarball and switch into the extracted folder – this will change depending on the latest revision available from GitHub. You can directly download and extract it.
$ tar -xvf xhprof.tar.gz
$ cd facebook-xhprof-ec8b884/extension
Then install as normal.
$ phpize
$ ./configure
$ make
$ sudo make install
Now copy xhprof source to web dir (doc root folder) for viewing the logs and make dog dir inside it.
$ sudo cp -r facebook-xhprof-ec8b884/  /var/www/xhprof/
$ sudo mkdir /var/www/xhprof/log_data
$ sudo chmod -R 777 /var/www/xhprof/log_data/
Note: path of xhproff log dir must be php execute user accessible. Means it must be in /var/www/ dir or accessible to www-dada user as this www-data user execute php script and xhprof log are created by this www-data user.
Finally, we need to tell PHP to load the extension. Create a config file for it – I do this for cleanliness but you can always drop it at the end of your main php.ini.
$ sudo gedit /etc/php5/conf.d/xhprof.ini
And paste in the following:
extension=xhprof.so
xhprof.output_dir="/var/www/xhprof/log_data"
This tells XHProf to use the directory at /var/www/xhprof/log_data to save its run data.
Note: path of xhproff log dir must be php execute user accessible. Means it must be in /var/www/ dir or accessible to www-dada user as this www-data user execute php script and xhprof log are created by this www-data user.
You can check whether XHProf is installed correctly by entering php -m at the command line and checking that the module is available. Remember to restart Apache so that it gets picked up in your PHP web applications as well.
If you want to render the callgraph images you’ll also need the graphviz package. This can be obtained from apt.
$ sudo apt-get install graphviz
Now xhprof ready
With front end – http://localhost/xhprof/xhprof_html/

Step 3.) Finally how to Integration XHProf with CodeIgniter
First setup codeigniter:
Download codeigniter and extract it in home folder
http://ellislab.com/codeigniter
Copy code to web root folder to make accessible to apache with localhost
$ sudo cp -R CodeIgniter_2.1.4 /var/www/
Now open from localhost CI URL
http://localhost/CodeIgniter_2.1.4/

If this works then CI setup ready
XHProf can be used on an ad-hoc basis to evaluate small pieces of code, but it’s at its most useful when you let it profile the full page. First of all, you’ll need to move the XHProf code into your web applications root so that it has access to the appropriate classes.
This already explained in 2nd setup, but again I will explain it.
Copy xhprof source to web dir (doc root folder) for viewing the logs and make log dir inside it or inside doc root to make www-data user accessible and also set writable permission to www-data user. This has been done in 2nd step so it must not be done again.
$ sudo cp -r facebook-xhprof-ec8b884/  /var/www/xhprof/
$ sudo mkdir /var/www/xhprof/log_data
$ sudo chmod -R 777 /var/www/xhprof/log_data/
Note: path of xhproff log dir must be php execute user accessible. Means it must be in /var/www/ dir or accessible to www-dada user as this www-data user execute php script and xhprof log are created by this www-data user.
http://localhost/xhprof/xhprof_html/
CodeIgniter has an excellent mechanism for injecting custom code into the execution of a page called ‘Hooks’. This is what we’ll use to integrate XHProf with your application.
Enable hooks in your application/config/config.php file.
$ sudo gedit /var/www/CodeIgniter_2.1.4/application/config/config.php
application/config/config.php file :
//set enable_hooks to true
$config['enable_hooks'] = true;
// and
/*
 XhProf config
*/
$config['xhprof_lib_dir'] = '/var/www/xhprof/log_data/';
$config['xhprof_ui_url'] = 'http://localhost/xhprof/xhprof_html/index.php';
$config['xhprof_flag'] = TRUE; // TRUE / FALSE to enable and disable
Then specify your hooks in application/config/hooks.php
$ sudo gedit /var/www/CodeIgniter_2.1.4/application/config/hooks.php
application/config/hooks.php file:
<?php if ( ! defined('BASEPATH')) exit('No direct script access allowed');
/*
| -------------------------------------------------------------------------
| Hooks
| -------------------------------------------------------------------------
| This file lets you define "hooks" to extend CI without hacking the core
| files. Please see the user guide for info:
|
| http://codeigniter.com/user_guide/general/hooks.html
|
*/

$hook['pre_controller'] = array(
 'class' => 'XHProf',
 'function' => 'XHProf_Start',
 'filename' => 'xhprof.php',
 'filepath' => 'hooks',
 'params' => array()
);

$hook['post_controller'] = array(
 'class' => 'XHProf',
 'function' => 'XHProf_End',
 'filename' => 'xhprof.php',
 'filepath' => 'hooks',
 'params' => array()
);

$hook['post_system'] = array(
 'class' => 'XHProf',
 'function' => 'XHProf_list_runs',
 'filename' => 'xhprof.php',
 'filepath' => 'hooks',
 'params' => array()
);

/* End of file hooks.php */
/* Location: ./application/config/hooks.php */
Then create the hook that will load XHProf into your application at application/hooks/xhprof.php. This class will provide the necessary minimum to get XHProf collecting data from your application.
$ sudo gedit /var/www/CodeIgniter_2.1.4/application/hooks/xhprof.php
application/hooks/xhprof.php file:
<?php if ( ! defined('BASEPATH')) exit('No direct script access allowed');

class XHProf {

 private $XHProfPath = '/var/www/xhprof/';
 private $applicationName = 'my_xhprof_CI';
 private $sampleSize = 1;
 private static $enabled = false;
 private $suffix = 'xhprof';
 private static $xhprof_flag = false;

var $CI;

 public function XHProf_Start() {
 self::$xhprof_flag = config_item('xhprof_flag');
 if (self::$xhprof_flag && mt_rand(1, $this->sampleSize) == 1) {
 include_once $this->XHProfPath . 'xhprof_lib/utils/xhprof_lib.php';
 include_once $this->XHProfPath . 'xhprof_lib/utils/xhprof_runs.php';
 xhprof_enable(XHPROF_FLAGS_NO_BUILTINS);
 self::$enabled = true;
 }
 }

 public function XHProf_End() {
 if (self::$xhprof_flag && self::$enabled) {
 $XHProfData = xhprof_disable();

$XHProfRuns = new XHProfRuns_Default();
 $this->CI =& get_instance();

$name = $this->applicationName;
 $className = $this->CI->router->class;
 if(!empty($className))
 $name .= '_' . $className;
 $methodName = $this->CI->router->method;
 if(!empty($methodName))
 $name .= '_' . $methodName;

$XHProfRuns->save_run($XHProfData, $name);
 }
 }

function XHProf_list_runs() {
 if (self::$xhprof_flag && self::$enabled) {

$this->CI =& get_instance();

$name = $this->applicationName;
 $className = $this->CI->router->class;
 if(!empty($className))
 $name .= '_' . $className;
 $methodName = $this->CI->router->method;
 if(!empty($methodName))
 $name .= '_' . $methodName;

 $xhprof_lib_dir = config_item('xhprof_lib_dir');
 $xhprof_ui_url = $this->CI->config->item('xhprof_ui_url');

if (is_dir($xhprof_lib_dir)) {

 echo "<hr/>Current runs:\n<ul>\n";
 $files = glob("{$xhprof_lib_dir}/*.$name.{$this->suffix}");
 usort($files, create_function('$a,$b', 'return filemtime($b) - filemtime($a);'));
 $f = true;
 foreach ($files as $file) {

 list($run,$source) = explode('.', basename($file));
 echo '<li><a href="' . htmlentities($xhprof_ui_url)
 . '?run=' . htmlentities($run) . '&source='
 . htmlentities($source) . '" target="_blank">'
 . htmlentities(basename($file)) . "</a><small> "
 . date("Y-m-d H:i:s", filemtime($file)) . "</small></li>\n";
 if($f)
 {
 $f = false;
 echo "</ul>\n<hr/>Older runs:\n<ul>\n";
 }
 }
 echo "</ul>\n";
 }
 }

 }

}

?>
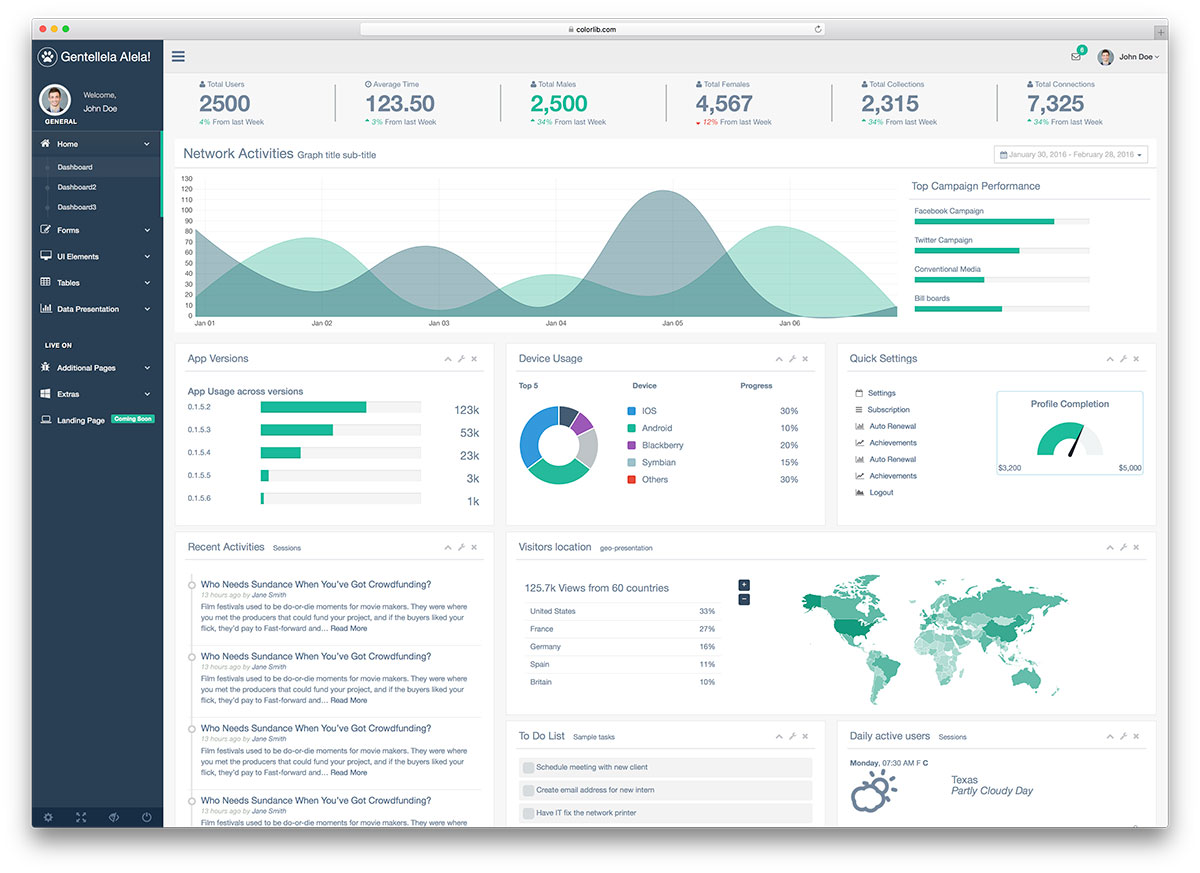
Now open from localhost CI URL
http://localhost/CodeIgniter_2.1.4/

If you see this then it works
There’s a few thing to point out in this code sample.
• The $XHProfPath variable should point to the directory you installed XHProf in as explained in step 2 and also above in this step. In our example, we put it in the root of the web application, but you might be storing it somewhere central and symlinking it to multiple applications.
• The $applicationName variable lets you specify the name of the application using XHProf. This could be especially important in an environment where you’re running multiple applications on the same server.
• The $sampleSize variable lets you specify a factor for how often XHProf profiles a run. In a production environment where you’re receiving thousands of hits, it’s probably not worth storing every single run. You can increase this variable to get a random sample of runs. Changing it to 10, for example, will give you a report from one in every 10 visits to your application.
The xhprof_enable() function can accept any combination of 3 constants.
• XHPROF_FLAGS_NO_BUILTINS – skip all internal php functions. Adding this means you’ll only see time spent in functions that you have written (or are part of CodeIgniter)
• XHPROF_FLAGS_CPU – add additional CPU profiling information
• XHPROF_FLAGS_MEMORY – add additional memory profiling information
• Combine them using +. eg. xhprof_enable(XHPROF_FLAGS_NO_BUILTINS + XHPROF_FLAGS_MEMORY);
After running through your application a couple of times, point your browser at the XHProf application directory http://localhost/xhprof/xhprof_html/index.php – adjusting for the address of your development server – and you’ll see a list of your last application runs with the newest at the top. Select one of the runs to see its profiling information.

Evaluating the Results
Storing all this profiling information is all very well and good but knowing how to evaluate it is the key to optimizing your application.
The ‘Overall Summary’ is a good place to start – it’ll show you:
• Total inclusive wall time – how long (in microseconds) it took for you page to be generated
• Total memory use – the total memory used by this run of your application
• Total peak memory use – the maximum amount of memory that was used by your application
• Number of function calls – the number of functions that were called by your application

These numbers should give you an overall base to start from and provide headline numbers to compare against when you start optimization.
Below the summary is the detailed run report the bottlenecks in your application should be fairly obvious – they’re the function calls at the top of the report.
The most resource intensive things you’re likely to come across will be those that make calls to external services or your database. By default, the results are sorted by ‘inclusive wall time’. This shows the functions that took the longest to run by the cumulative total of them and the functions they call. Ordering by ‘exclusive wall time’ allows you to see the specific functions that are using the most amount of resource.
Clicking a function allows you to drill down into more detail about that function and the functions it called. From there, it’ll be easier to see exactly what your long running function was doing and spot any issues.
When debugging your CodeIgniter application, one of the best places to start is the controller being called for your page – Welcome::index in the example. From there you can easily see the breakdown of where the controller spent most of its time.

Callgraph
XHProf can generate a call graph view that provides a visual clue to the main path of your application. The main bottlenecks are highlighted in red to show where most your resources are being spent.

Comparing Runs
XHProf provides a mechanism for comparing multiple runs – this will allow you to make a number of optimizations and then see how they’ve affected your application.
http://localhost/xhprof/xhprof_html/index.php?run1=run_id_1>&run2=run_id_2&source=applicationName
Note: run_id_1 and run_id_2 should be the ids from some of your previous runs and applicationName should be the name you specified when setting up the hook earlier.
This will provide the same information you see in a regular report but provide percentage statistics on any changes since the first run, allowing you to easily see if your optimizations are moving your performance in the right direction.
http://localhost/xhprof/xhprof_html/index.php?run1=526fa02b94f31&run2=526fa0255926b&source=my_xhprof_CI_welcome_index

Aggregating Runs
Sometimes a single run might not be enough to evaluate exactly what’s going on. Pages my work slightly differently depending on the query string or user input or there might be differences in caching mechanisms.
Aggregating a number of runs allows you to combine a number of runs and receive an average of the resources consumed.
http://localhost/xhprof/xhprof_html/index.php?run=run_id,run_id,run_id&source=applicationName
Note: run_id should be the ids from some of your previous runs and applicationName should be the name you specified when setting up the hook earlier.
http://localhost/xhprof/xhprof_html/index.php?run=526fa02b94f31,526fa0255926b&source=my_xhprof_CI_welcome_index

Summary
You should now have XHProf up and running in your CodeIgniter application and be able to see exactly where your code is spending most of it’s time. Optimisation can be a difficult task. Sometimes it’s not as simple as reimplementing a function, or adding a layer of caching. Thinking about why you’re doing something and what the exact effect that is having on your application is just as important.
So let me know if you have any questions in the comments below. Thank you so much for reading!
References:
http://net.tutsplus.com/tutorials/php/advanced-codeigniter-profiling-with-xhprof/
https://github.com/facebook/xhprof
http://www.catswhocode.com/blog/how-to-create-a-simple-and-efficient-php-cache
http://css-tricks.com/snippets/php/intelligent-php-cache-control/
http://www.phptoys.com/tutorial/speed-up-with-caching.html
http://www.addedbytes.com/articles/for-beginners/output-caching-for-beginners/
Xcache: http://xcache.lighttpd.net/
APC: http://php.net/manual/en/book.apc.php
Varnish: https://www.varnish-cache.org/
http://www.sitepoint.com/getting-started-with-varnish/
Even More: http://en.wikipedia.org/wiki/List_of_PHP_accelerators


Recent Comments